Transfer molding is a unique molding process that has evolved substantially since its invention. Its uniqueness is due to its hybrid nature, as it combines the fundamentals of both injection and compression molding.
The transfer molding technique is a versatile and efficient manufacturing process that can be employed for various applications. In this article, we discuss the basics of the transfer molding process, its variations, advantages, and challenges in detail.
Transfer molding is a type of manufacturing process that involves pressing a casting material into a closed mold. It includes creating a product by filling a mold cavity with raw material. The raw material is first injected into the mold cavity, after which the raw material solidifies and creates the casting. The casting is further, ejected from the mold cavity, which is the product. The mold used in this technique is hollow. The hollow cavity of the mold has an inside surface that defines the product shape.
The transfer molding process is a precision manufacturing process as it involves the transfer of a pre-measured amount of heated material into the mold cavity.
This particular manufacturing process applies generally to thermosetting plastics and rubbers. Though this process works best with thermosets, it can work with some thermoplastics as well.
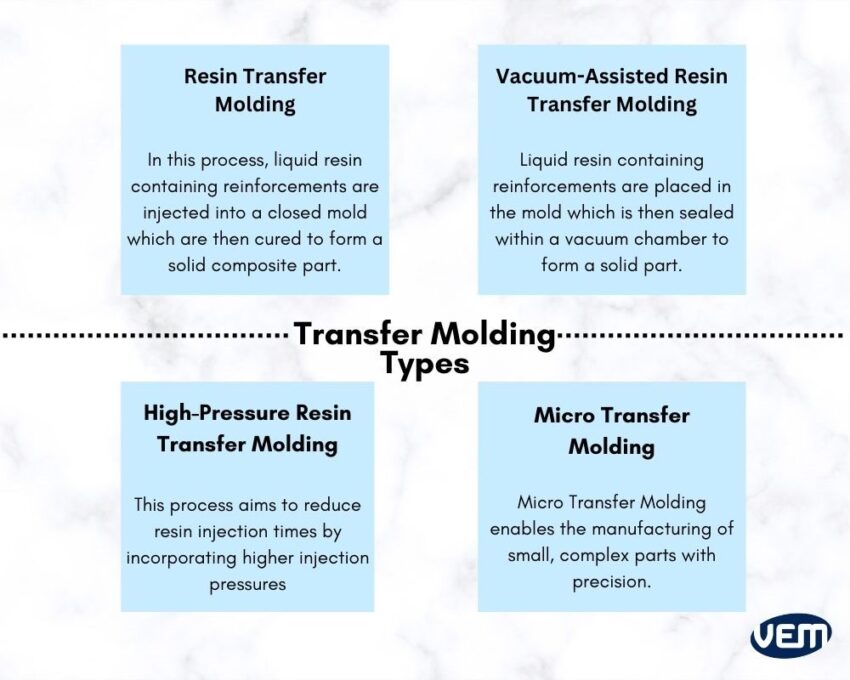
Resin transfer molding is one of the most common transfer molding variations. In this process, liquid resin is injected into a closed mold that contains pre-placed reinforcements which are then cured to form a solid composite part. This process primarily involves incorporating dry reinforcement composites, such as fiberglass, carbon fiber, or Kevlar for molding. The raw materials also include additives and curing agents.
The initial setup and tooling costs of RTM can be high, however; RTM processes versatile thermosets, and is fast and repeatable.
VARTM combines the principles of resin transfer molding, however; it incorporates a vacuum chamber. In this particular process, dry reinforcement materials are placed and the mold is then sealed within a vacuum chamber. The vacuum eliminates any type of trapped air in the cavities by compacting the resins. This particularly avoids any type of void formation.
VARTM provides more design flexibility and addresses potential structural and strength issues.
HP-RTM is another variant of RTM that aims to reduce resin injection times and improve part consolidation by incorporating higher injection pressures. In the case of HP-RTM, the resin injection time is typically around 1-5 minutes which is significantly shorter than the resin transfer molding process, which can take between 30-60 minutes.
Micro Transfer Molding refers to manufacturing products that are small in size and weight via the transfer molding process. For instance: Tiny electric connectors, microfluidic devices, micro-scale medical implants, and some micro-optical components. These components can weigh a few grams and size can be in millimeters thus, the size of transfer molds, setups, and other equipment is also small.
Micro Transfer Molding enables the manufacturing of small, complex parts with precision.
Epoxy resins are thermosets that undergo an irreversible chemical reaction upon curing.
Epoxy resins are versatile and exhibit low viscosity, excellent mechanical properties, electrical insulation properties, and high chemical resistance. Its low viscosity allows it to easily flow during the transfer molding process, thereby ensuring precision and accuracy during replication.
Silicone is known for its flexibility, durability, thermal stability, weather resistance, temperature resistance, and bio-compatibility. It is thus employed for various applications.
Polymers such as polyurethane and polyesters are apt for transfer molding due to their versatility and various properties.
Polyurethane demonstrates excellent flexibility, strength, and chemical resistance thereby, making it ideal for applications where durability and elasticity are a priority.
Polyester demonstrates good heat resistance and mechanical strength and they can be easily formulated with various additives, fillers, and reinforcements to meet specific application requirements.
Natural rubber or synthetic elastomers are easily processed via the transfer molding process. They are recognized for their elasticity and resilience. You should note that post-curing or vulcanization processes may be required to achieve the required properties.
Some resins such as ABS can’t be used as they demonstrate limitations in terms of temperature resistance and dimensional stability but various plastics such as polypropylene and polycarbonate are considered for transfer molding for various applications. Polypropylene demonstrates excellent flow properties, chemical resistance, and dimensional stability and Polycarbonate demonstrates high impact strength, transparency, and heat resistance.
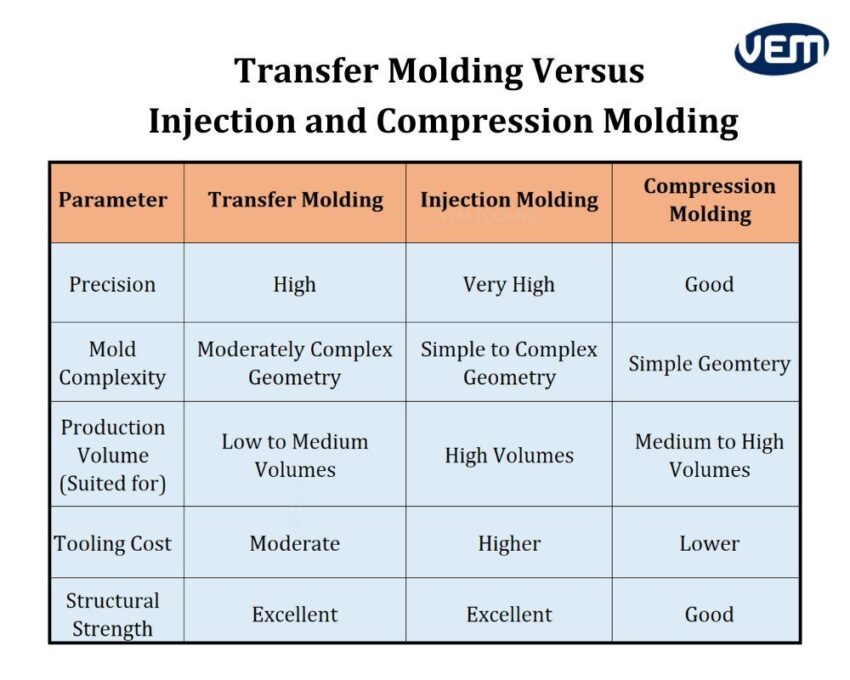
Transfer molding and injection molding are both popular manufacturing techniques but they differ in various aspects. Let’s understand these aspects further:
Transfer and compression molding are quite similar but they distinctly differ in some areas.
The lifespan of transfer molded products is dependent upon a variety of factors such as the material used, its environmental conditions, and its intended application but they typically demonstrate increased durability as they have a good strength-to-weight ratio.
The specific durability of a transfer molded part depends upon its characteristics and usage conditions but it is typically between 5 to 20+ years.
The heat resistance of transfer-molded parts is largely dependent upon the material type such as silicone rubber and phenolic resins that demonstrate excellent heat resistance as they can withstand extremely high temperatures without degradation.
You should note that not all thermoplastics are suitable for transfer molding. For instance: Polyethylene is a type of thermoplastic that isn’t suitable for transfer molding due to its low melting point.
The stretchability of transfer-molded products is determined by the type of material used and the part geometry. Flexible polymers, elastomers, silicones, and polyurethane thermosets create stretchable products via transfer molding.
The technique of transfer molding can be applied to various applications due to its materials and complexity handling capability, its precision, surface finish, and insert molding features.
The transfer molding process is ideal for encapsulating delicate components thereby providing insulation and protection against various environmental factors. It is thus, popularly applied to manufacture insulators, connectors, circuit boards, switches, and transformers in the electronic and electrical industry.
In the medical device industry, the transfer molding technique is employed especially for silicone overmolding which is particularly applied for manufacturing handles of medical devices and surgical instrument components. The transfer molding process helps to enable the production of sterile, and precise biocompatible components.
Rubber transfer molding technique is applied to manufacture Grommets, Washers, and O-rings due to its ability to create detailed and complex shapes with precision and consistency.
The transfer molding technique is often applied to create metal-to-rubber face seals that are particularly used in the natural gas industry to create interfaces for gas valves.
The transfer molding technique manufactures parts that demonstrate high dimensional accuracy and can withstand harsh conditions. They are thus, popularly used to manufacture various automotive parts such as seals, gaskets, dashboards, door handles, and engine components.
Transfer molding is often used to manufacture lip or U-cup designs in the hydraulic industry as it allows sharper cutoffs during molding. A defined lip edge leads to sharp lip seals thereby creating flash-free parts.
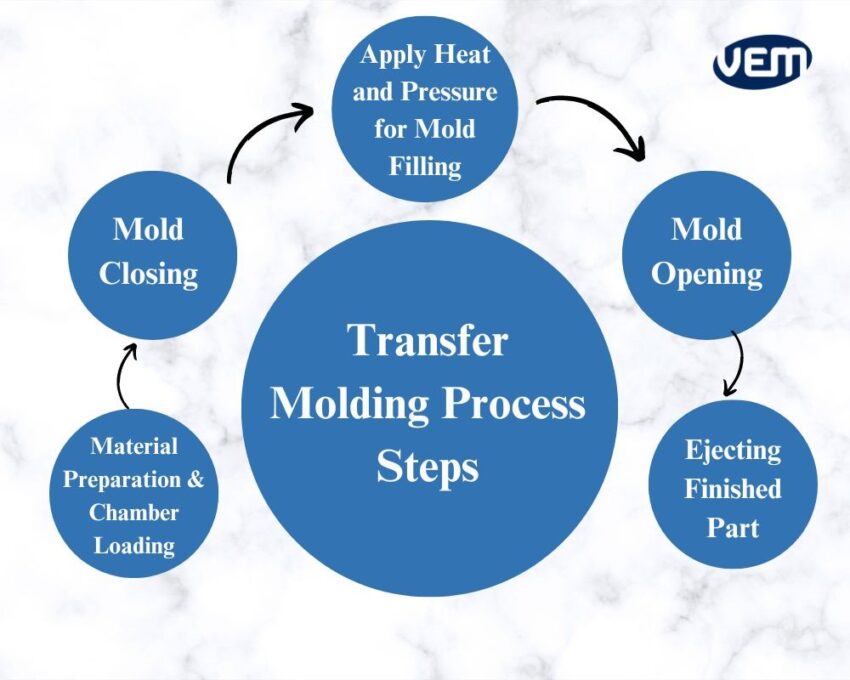
The transfer molding process begins with the preparation of the molding compound. At this stage, the resin is converted into powder, pellets, or granules. In addition, if it’s required, colorants, plasticizers, stabilizers, or other additives are added to help, achieve a particular property or aesthetics.
In this step, the prepared compound is now placed in the transfer chamber through a gravity feed mechanism. It is critical to ensure that the mold is cleaned thoroughly at this stage.
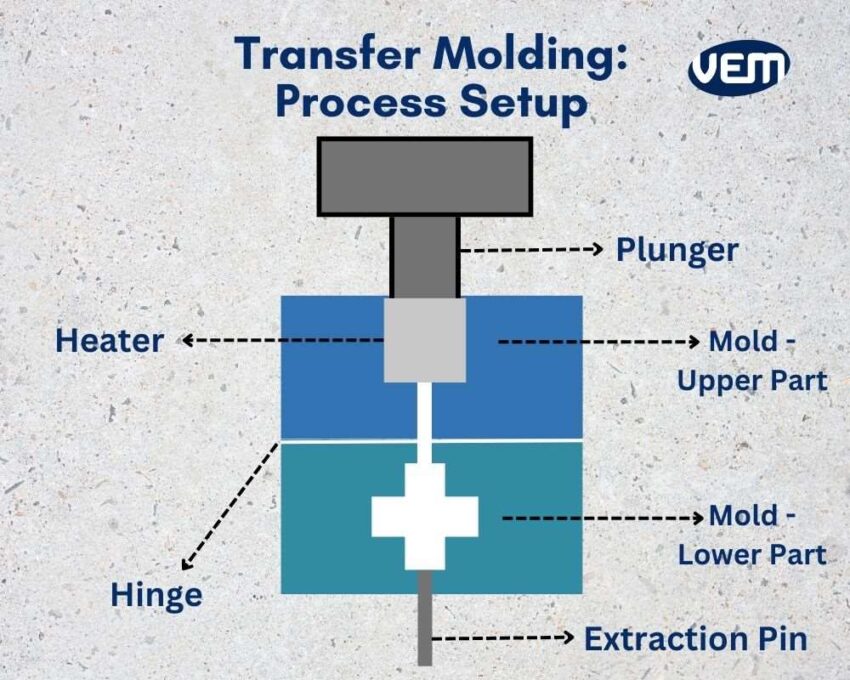
In this step, the material moves from the transfer pot to the cavities after which, the mold is closed. Here, the plunger pushes the material into the cavities, generally, with the help of a hydraulic press.
A continuous pressure is applied to keep the mold closed. Along with the pressure, heat is also applied to cure the material. You should note that only when there is uniform heating across the mold, a consistent curing can take place.
The heat and pressure force the material to flow across the cavities to fill the mold. The heated and pressurized material undergoes a chemical transformation to take the shape of cavities. Some of the essential parameters for curing the material are time, pressure, and temperature control.
Once the material is cured, the plunger returns to its initial position due to hydraulic control, which further releases the pressure upon the mold. A careful opening needs to be considered to ensure a defect-free or damage-free part.
In this stage, the part is ejected from the mold through ejector pins which are placed in such a way that they push the part out of the mold without causing any damage.
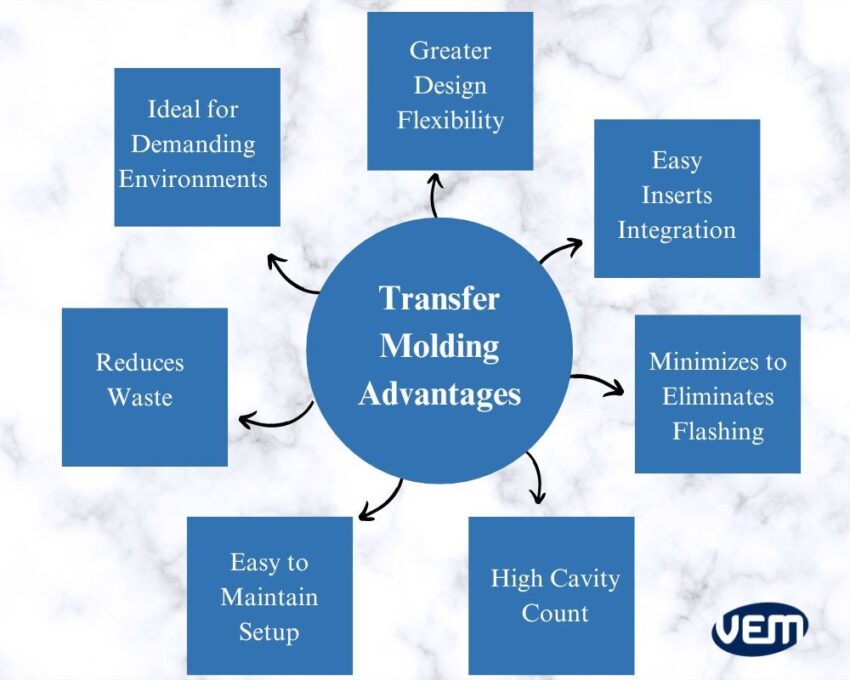
Transfer molding offers several advantages to manufacturers. Let’s understand the several advantages of the process:
While transfer molding has various advantages, there are some challenges to the process as well. Let’s understand these challenges further:
The transfer molding process requires expertise and tooling experience to produce high-quality parts. It is crucial to understand the specific requirements of a project to determine whether transfer molding is suitable.
While we are more focused on injection molding and tooling, our wide range of services also include prototyping, retail assembly and more.